
Classic Key Lime Pie: Real Juice, Graham Crust, Proper Set
Classic Key lime pie with a graham crust, a Key-versus-Persian juice test, and a short bake that sets the filling cleanly so every slice holds its shape.
Ingredients
- 1 1/2 cups graham cracker crumbs (about 10 full sheets)
- 2 tablespoons granulated sugar
- 1/8 teaspoon fine salt
- 6 tablespoons unsalted butter, melted
- 4 large egg yolks
- 1 tablespoon finely grated lime zest
- One 14-ounce can sweetened condensed milk
- 1/2 cup fresh lime juice, strained (Key, Persian, or a blend)
- Pinch of fine salt
- 1 cup cold heavy cream
- 2 tablespoons powdered sugar
- Thin lime slices or extra zest, for garnish
Instructions
- Heat the oven to 350°F with a rack in the center. Stir the graham crumbs, sugar, and salt together in a bowl, then pour in the melted butter and mix with a fork until the crumbs look like wet sand and hold together when you squeeze a handful.
- Tip the crumbs into a 9-inch glass or metal pie plate. Press them firmly into the bottom and up the sides, using the flat bottom of a measuring cup for the base and your thumb along the walls. Pack hard; loose crumbs are what make a crust fall apart.
- Bake the crust for 10 minutes, until it smells toasty and looks slightly darker at the edge. Set it on a wire rack. Leave the oven on at 350°F.
- While the crust bakes, whisk the egg yolks and lime zest in a large bowl for about 2 minutes, until the mixture turns pale and thick. The zest will tint the yolks green-gold.
- Whisk in the condensed milk until smooth, then add the lime juice and salt. Whisk gently for about 30 seconds. The mixture will visibly thicken as the acid hits the milk, and that is exactly what you want.
- Pour the filling into the warm crust and tap the plate on the counter twice to release any large bubbles.
- Bake for 15 to 17 minutes, until the edges are set and the center still jiggles slightly, like gelatin, when you nudge the plate. It should not ripple like liquid. Do not let it brown on top.
- Cool the pie on a rack for 30 minutes, then refrigerate, uncovered, for 15 minutes, then cover loosely and chill for at least 4 hours, or overnight, until fully firm.
- Just before serving, whip the cream and powdered sugar to soft peaks. Slice the pie with a hot, dry knife, wiping the blade between cuts, and top each slice with cream and a lime slice or a little zest.
Notes
- Fits a standard 9-inch pie plate, about 1 1/4 inches deep. You need roughly 1/2 cup of lime juice, which is 12 to 15 Key limes or 4 to 5 Persian limes.
The first Key lime pie I made was a bowl of sweet lime soup in a crumbling crust. I had followed a recipe that said to simply stir and chill, and the filling never really firmed up. The slice slumped, the crust fell apart under the fork, and the flavor was a flat, sugary lime with no snap to it.
It took me a long run of pies to learn that three decisions make or break this dessert: which juice you squeeze, whether you give the pie a short bake, and how you press and pre-bake the graham crust. None of them is difficult. All of them are rarely explained.
This is the pie I now make without thinking. It has a tart, creamy filling that cuts cleanly, a crust that holds together to the last bite, and a bright flavor that tastes like limes instead of lime candy. I will walk through the juice and the bake in detail below, because that is where most pies go wrong.
Why This Works
Sweetened condensed milk is thick and the yolks are rich, but the acid in lime juice does the heavy lifting: it tightens the milk proteins and the yolks so the filling thickens before the pie ever sees the oven. The short bake does not cook the pie so much as finish the job. Those few minutes gently set the yolk proteins all the way through, so the filling slices cleanly instead of oozing, and they make the pie safe to serve because the yolks are warmed rather than left raw.
Ingredients
Fits a standard 9-inch pie plate, about 1 1/4 inches deep. You need roughly 1/2 cup of lime juice, which is 12 to 15 Key limes or 4 to 5 Persian limes.
For the Graham Crust
- 1 1/2 cups graham cracker crumbs (about 10 full sheets)
- 2 tablespoons granulated sugar
- 1/8 teaspoon fine salt
- 6 tablespoons unsalted butter, melted
For the Filling
- 4 large egg yolks
- 1 tablespoon finely grated lime zest
- One 14-ounce can sweetened condensed milk
- 1/2 cup fresh lime juice, strained (Key, Persian, or a blend)
- Pinch of fine salt
To Serve
- 1 cup cold heavy cream
- 2 tablespoons powdered sugar
- Thin lime slices or extra zest, for garnish
Easy Swap
No Key limes? Use all Persian lime juice and add a teaspoon of extra zest, which brings back some of the floral aroma. A blend of Persian juice with a splash of fresh lemon juice also works if you want a slightly sharper pie.
How to Make It
Prep: 30 minutes | Bake: 20 minutes | Cool or chill: 4 hours | Serves: 8 slices
- Heat the oven to 350°F with a rack in the center. Stir the graham crumbs, sugar, and salt together in a bowl, then pour in the melted butter and mix with a fork until the crumbs look like wet sand and hold together when you squeeze a handful.
- Tip the crumbs into a 9-inch glass or metal pie plate. Press them firmly into the bottom and up the sides, using the flat bottom of a measuring cup for the base and your thumb along the walls. Pack hard; loose crumbs are what make a crust fall apart.
- Bake the crust for 10 minutes, until it smells toasty and looks slightly darker at the edge. Set it on a wire rack. Leave the oven on at 350°F.
- While the crust bakes, whisk the egg yolks and lime zest in a large bowl for about 2 minutes, until the mixture turns pale and thick. The zest will tint the yolks green-gold.
- Whisk in the condensed milk until smooth, then add the lime juice and salt. Whisk gently for about 30 seconds. The mixture will visibly thicken as the acid hits the milk, and that is exactly what you want.
- Pour the filling into the warm crust and tap the plate on the counter twice to release any large bubbles.
- Bake for 15 to 17 minutes, until the edges are set and the center still jiggles slightly, like gelatin, when you nudge the plate. It should not ripple like liquid. Do not let it brown on top.
- Cool the pie on a rack for 30 minutes, then refrigerate, uncovered, for 15 minutes, then cover loosely and chill for at least 4 hours, or overnight, until fully firm.
- Just before serving, whip the cream and powdered sugar to soft peaks. Slice the pie with a hot, dry knife, wiping the blade between cuts, and top each slice with cream and a lime slice or a little zest.
Don’t Do This
Do not skip the bake because the filling thickens on its own. Unbaked, the yolks stay raw and the filling slumps when sliced. Also, do not bake until the center is firm; it will keep setting as it cools, and an overbaked filling turns rubbery and cracks.
Can You Make This Pie Ahead?
Yes — Here Is the Timeline
Bake the whole pie up to two days ahead and keep it covered in the refrigerator, or freeze it for up to a month. Whip the cream and garnish only at serving time.
This is one of the friendliest pies for advance work, because it needs to chill for hours anyway. Bake it the day before you plan to serve it, cool it completely, and refrigerate it. The filling actually slices more cleanly on day two, and the lime flavor settles into something rounder.
To freeze, chill the pie until fully set, then freeze it uncovered for about 2 hours until firm. Wrap it tightly in plastic and then foil. It keeps for a month. Thaw it overnight in the refrigerator, still wrapped, so condensation does not soften the crust.
Keep the whipped cream separate. Whipped cream weeps and loses its shape after a day, and it can dampen the surface of the filling. Whip it fresh, which takes about three minutes.
Key Limes vs. Persian Limes: What the Juice Actually Changes
Key limes are small, round, and yellow-green when ripe, and they taste different from the large dark green Persian limes you find at every grocery store. Key lime juice is more floral and more sharply acidic, with a slightly bitter, almost tea-like finish. Persian juice is cleaner, rounder, and a little milder. Neither one is wrong, but they make visibly different pies.
I tested the same filling three ways: all Key lime juice, all Persian lime juice, and half and half. The all-Key pie had the most distinctive flavor and a more pronounced perfume, but it was also the most assertive; a couple of tasters found it close to medicinal. The all-Persian pie was pleasant but a little one-note, tasting more like sweet lime custard than a Key lime pie. The blend was my favorite: the Key juice gave it character and the Persian juice softened the edges.
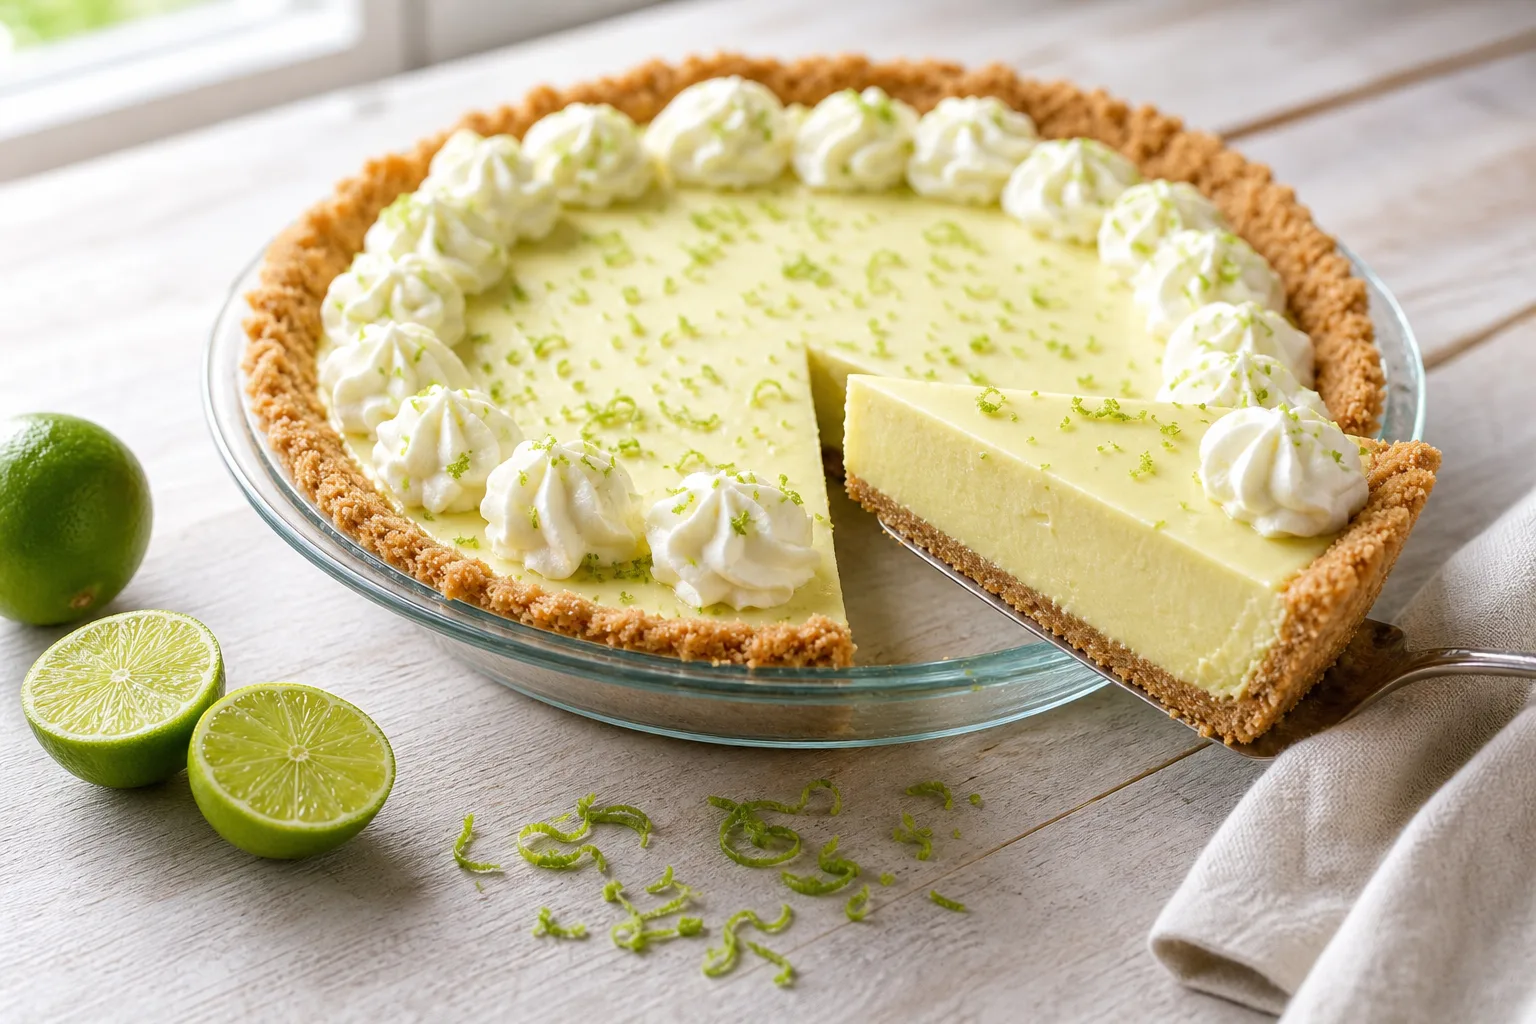
Color deserves a note too. Real Key lime pie is pale yellow, not green. The yolks and the juice combine to a soft ivory-gold, and any pie that looks bright green has food coloring in it. Do not add coloring. If you want a hint of green, the zest provides it naturally.
Key limes are small and fiddly, and it takes about 12 to 15 of them to yield a half cup of juice. A handheld citrus press makes the job fast. Squeeze them, strain out the seeds and pulp, and measure after straining, because pulp throws off the volume.
Margaret’s Tip
Roll each lime firmly under your palm on the counter before cutting. It breaks up the membranes inside and gets noticeably more juice out of small, hard limes.
Bottled vs. Fresh Juice
Bottled Key lime juice is a real product with a long history behind this pie, and I do not look down on it. Plenty of good Key lime pies are made with it, and when Key limes are out of season or hard to find, it is a sensible choice. The difference is in the flavor: bottled juice tastes flatter and a little cooked, and it lacks the volatile aromatics that make fresh juice smell like limes.
I made the pie with fresh Persian juice and with a well-known bottled Key lime juice and tasted them side by side, chilled, the next day. The fresh version was brighter, with a clean top note. The bottled version was tarter on the finish and more one-dimensional, but it set the same way and sliced the same way. So if you are choosing between them for texture, there is no difference. You are choosing for flavor.
My compromise when I want the Key lime character without a bag of tiny limes is to use half bottled Key lime juice and half fresh Persian juice, plus all the zest from the fresh limes. The zest does a lot of the work of making the pie smell fresh. Whichever you pick, make sure the bottle says lime juice and nothing else; avoid anything labeled as a cocktail mixer or lime drink, which is loaded with sugar and will throw off the balance.
One rule I do not bend: strain fresh juice. A little pulp is fine, but seeds and stringy bits make the filling grainy and unpleasant when you slice into it.
Why a Pie That Sets Itself Still Gets a Short Bake
Old-fashioned Key lime pie recipes often skip the oven entirely, and it is true that the acid in the juice thickens condensed milk and yolks on contact. Stir them together and you have something that looks like pudding within a minute. So why bake it at all?
There are two reasons, and they are both about the yolks. First, the acid thickens the filling but does not truly set it. An unbaked filling is soft and a bit pasty, and it flows out of the slice as soon as the knife leaves it. Second, the yolks stay raw. Fifteen minutes at 350°F brings them up to a gentle set, which gives the filling a custardy, sliceable body and means you are not serving raw egg to guests.
I tested this directly: one pie baked 16 minutes and one only chilled. The baked pie sliced into neat wedges with a clean, glossy face. The unbaked pie had a weaker, softer texture and a faint raw-yolk taste that I could pick out once I knew to look for it. The baked version also stayed intact on the plate for the length of a meal, which the other did not.
The cue to watch for is the jiggle. Pull the pie when the edges are firm and the center, about the size of a silver dollar, still wobbles like set gelatin when you nudge the plate. It continues to cook from residual heat and finishes firming in the refrigerator. If you wait for the whole surface to look solid, you have already gone too far, and the filling will crack and turn dense.
Don’t Do This
Do not leave the pie in the oven while you wait for the top to brown. A browned Key lime filling is an overbaked one, with a rubbery texture and a muted flavor. You want pale and barely set.
Margaret’s Tip
Press the crust, then chill the pressed shell for 15 minutes before baking. Cold butter in the crumbs firms up, the walls hold their shape better, and the finished crust is noticeably less crumbly.
Questions People Ask
Why is my graham cracker crust crumbly?
Usually the crumbs were not packed tightly enough or there was too little butter. Use the full 6 tablespoons of melted butter, press hard with the bottom of a measuring cup, and always bake the crust for 10 minutes. Baking melts the sugar and butter into a binder that holds the crumbs together once they cool.
Do I really need Key limes to make Key lime pie?
No. Persian limes make a perfectly good pie, and a blend of Key and Persian is my favorite. If you use only Persian juice, add extra zest to bring back some of the floral flavor that Key limes have naturally.
How do I know when the pie is done baking?
The edges should be set and the center should wobble slightly, like gelatin, when you gently shake the plate. It should not ripple like liquid. Pull it then; it will finish setting as it cools and chills.
Why did my filling crack on top?
Cracks come from overbaking or cooling too quickly. Pull the pie while the center still jiggles, let it cool on a rack for 30 minutes before moving it to the refrigerator, and avoid drafts. A pie that is baked just until barely set and cooled gradually should stay smooth.
About This Article

Written by Margaret Chen. Margaret Chen is a home baker and recipe developer with over 15 years of experience perfecting cookie recipes through rigorous testing and detailed experimentation. She tests every recipe multiple times, documents every variable, and applies the same rigor professional bakers use, with the warmth and accessibility of home baking. More about this site.
Scope and limits. Margaret is a home baker and recipe developer with no formal culinary training. Follow current food safety guidance for egg handling, storage, and anything you are serving to other people.
Verify this against a primary source
Specifics change, and your situation may differ from the one described here. These are the authorities worth checking directly:
- USDA FoodData Central — ingredient composition and nutrition data
- FoodSafety.gov — safe handling, storage and egg safety